Keto Stuffed Cabbage

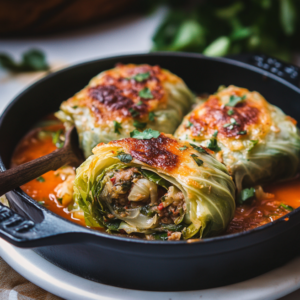
Looking for a comforting, low-carb take on a classic favorite? Keto Stuffed Cabbage offers a modern, time-saving twist on traditional stuffed cabbage rolls. Tender cabbage leaves are filled with flavorful seasoned ground beef, then simmered in a rich tomato sauce and perfectly cooked in the Instant Pot. Plus, it’s dairy-free, nut-free, and fits seamlessly into Whole30 and SCKC lifestyles!

Inspired by cherished memories of Polish Golumpki, this recipe skips the hours of prep: a quick microwave steam softens the cabbage, and the Instant Pot locks in bold flavors in under an hour. Whether you’re keto-curious or simply craving a hearty, guilt-free meal, these rolls deliver nostalgia and convenience in every bite—no dairy required!

Ingredients

For the Tomato Sauce:

1 (14-ounce) can unsweetened diced tomatoes (no added sugars)

¼ cup extra-virgin olive oil

1 tablespoon apple cider vinegar (for tangy brightness)

1 teaspoon garlic powder

1 teaspoon onion powder

1 teaspoon dried oregano

½ teaspoon red pepper flakes (adjust for heat preference)

• Kosher salt and freshly ground black pepper (to taste)

For the Dairy-Free Stuffed Cabbage Rolls:

12 large cabbage leaves (steamed until pliable)

1 pound ground beef (80/20 blend for moisture)

¾ pound ground pork (or substitute with more beef)

1 cup riced cauliflower (fresh or frozen, for low-carb texture)

3 green onions, thinly sliced (both white and green parts)

¼ cup fresh parsley, finely chopped (plus extra for garnish)

Freshly ground black pepper (to season the filling)

Step-by-Step Directions

For the Tomato Sauce:

Blend the Sauce Base: In a blender, combine the diced tomatoes, apple cider vinegar, red pepper flakes, onion powder, garlic powder, and oregano. Pulse until smooth. Season generously with salt and pepper.
Simmer to Develop Flavor: Heat olive oil in a deep skillet or pot over medium heat. Pour in the blended tomato mixture, bring to a gentle simmer, then reduce heat to medium-low. Cook uncovered for 20 minutes, stirring occasionally, until the sauce thickens slightly.

For the Cabbage Rolls:

Prepare the Cabbage Leaves: Bring a large pot of water to a boil. Blanch cabbage leaves for 1 minute until pliable (or microwave leaves with ¼ cup water for 2-3 minutes in a covered dish). Drain and set aside.
Mix the Filling: In a bowl, combine ground beef, ground pork, riced cauliflower, green onions, parsley, ½ cup of the prepared tomato sauce, and a pinch of salt and pepper. Mix until evenly incorporated.

Assemble the Rolls:

Trim the thick rib from each cabbage leaf with a knife.
Place ⅓ cup of filling near the base of a leaf. Fold the sides inward, then roll tightly from the bottom to enclose the filling.
Spread a thin layer of tomato sauce in the bottom of a large baking dish. Arrange rolls seam-side down over the sauce.
Bake: Pour the remaining sauce over the rolls. Cover the dish with foil and bake at 375°F for 45–55 minutes, or until the internal temperature of the filling reaches 160°F (the safe minimum for ground meat).
Serve: Garnish with fresh parsley and serve warm.
Storage Instructions:

To preserve your dairy-free keto stuffed cabbage rolls, refrigerate leftovers in an airtight container with any remaining tomato sauce to lock in moisture and keep the cabbage leaves tender. Consume within 3–4 days for optimal freshness.

When reheating, warm gently in the oven or microwave, adding a splash of water or extra tomato sauce to refresh the texture of the cabbage leaves.

Ensure the ground beef filling reaches an internal temperature of 165°F for safety. Avoid prolonged refrigeration, as the cabbage may soften slightly over time—serve promptly for the best texture and flavor.

Tips for Achieving Maximum Flavor:

Elevate your dairy-free keto stuffed cabbage rolls by layering bold, savory notes. Start by thoroughly browning the ground beef and pork mixture—this creates a rich, caramelized base for the filling.

Infuse the tomato sauce with depth by toasting the dried spices (oregano, garlic powder, red pepper flakes) in olive oil before blending, unlocking their aromatic oils. For brightness, stir a splash of apple cider vinegar into the sauce just before simmering.

Opt for fresh parsley and green onions in the filling to add herbaceous freshness that balances the hearty meat. Finally, let the assembled rolls rest in the sauce for 10 minutes post-baking; this allows the cabbage leaves to absorb the tangy tomato essence, ensuring every bite is bursting with flavor.

FAQ:

Can I swap ground pork for another meat?

Absolutely—ground turkey or chicken works well for a leaner option.

the cabbage leaves tough to handle?

Briefly steaming or microwaving them softens the leaves for easy rolling.

How do I keep the rolls from falling apart?

Trim the thick rib from each cabbage leaf and avoid overstuffing—⅓ cup of filling per leaf is ideal.

Can I make these ahead?

Yes! Assemble rolls and sauce separately, then refrigerate and bake just before serving.

Is the tomato sauce keto-approved?

Ensure your diced tomatoes have no added sugars, and adjust seasoning to taste. For more tips, refer to the full recipe above!

Keto Stuffed Cabbage

Prep Time 15 minutes
Total Time 1 hour 45 minutes
Course Main Course
Cuisine American

Ingredients
  

For the Tomato Sauce:

  • 1 14-ounce can unsweetened diced tomatoes (no added sugars)
  • ¼ cup extra-virgin olive oil
  • 1 tablespoon apple cider vinegar for tangy brightness
  • 1 teaspoon garlic powder
  • 1 teaspoon onion powder
  • 1 teaspoon dried oregano
  • ½ teaspoon red pepper flakes adjust for heat preference
  • Kosher salt and freshly ground black pepper to taste

For the Dairy-Free Stuffed Cabbage Rolls:

  • 12 large cabbage leaves steamed until pliable
  • 1 pound ground beef 80/20 blend for moisture
  • ¾ pound ground pork or substitute with more beef
  • 1 cup riced cauliflower fresh or frozen, for low-carb texture
  • 3 green onions thinly sliced (both white and green parts)
  • ¼ cup fresh parsley finely chopped (plus extra for garnish)
  • Freshly ground black pepper to season the filling

Instructions
 

For the Tomato Sauce:

  • Blend the Sauce Base: In a blender, combine the diced tomatoes, apple cider vinegar, red pepper flakes, onion powder, garlic powder, and oregano. Pulse until smooth. Season generously with salt and pepper.
  • Simmer to Develop Flavor: Heat olive oil in a deep skillet or pot over medium heat. Pour in the blended tomato mixture, bring to a gentle simmer, then reduce heat to medium-low. Cook uncovered for 20 minutes, stirring occasionally, until the sauce thickens slightly

For the Cabbage Rolls:

  • Prepare the Cabbage Leaves: Bring a large pot of water to a boil. Blanch cabbage leaves for 1 minute until pliable (or microwave leaves with ¼ cup water for 2-3 minutes in a covered dish). Drain and set aside.
  • Mix the Filling: In a bowl, combine ground beef, ground pork, riced cauliflower, green onions, parsley, ½ cup of the prepared tomato sauce, and a pinch of salt and pepper. Mix until evenly incorporated.
  • Assemble the Rolls:
  • Trim the thick rib from each cabbage leaf with a knife.
  • Place ⅓ cup of filling near the base of a leaf. Fold the sides inward, then roll tightly from the bottom to enclose the filling.
  • Spread a thin layer of tomato sauce in the bottom of a large baking dish. Arrange rolls seam-side down over the sauce.
  • Bake: Pour the remaining sauce over the rolls. Cover the dish with foil and bake at 375°F for 45–55 minutes, or until the internal temperature of the filling reaches 160°F (the safe minimum for ground meat).
  • Serve: Garnish with fresh parsley and serve warm.

Keto gnocchi

Hungry for the comforting chew of gnocchi while staying keto? This recipe reimagines the Italian classic with a low-carb twist, combining just five ingredients for dough that’s both tender and satisfying.

By melting mozzarella cheese in a microwave-safe bowl and blending it with almond flour, you’ll create a pliable gnocchi dough that’s surprisingly authentic. A touch of olive oil adds richness while ensuring a golden exterior.

At only 3 grams of net carbs per serving, these pillowy bites are accidentally gluten-free and proof that keto-friendly meals don’t skimp on flavor or texture. Swap potatoes for this clever alternative—your taste buds won’t know the difference!

Ingredients for Keto gnocchi :

  • ⅓ cup riced cauliflower– Fresh or store-bought, raw and patted very dry (excess moisture ruins the dough!).
  • ½ large egg yolk– Crack a yolk into a bowl, whisk lightly, and use half (freeze the rest for later!).
  • 1 tbsp + 1 tsp freshly grated parmesan– Skip the shelf-stable stuff; fresh grating melts better.
  • 2 tbsp blanched almond flour– Not almond meal (it’s too gritty for single-serving dough!).
  • 2 tbsp shredded mozzarella– Low-moisture works best (no pre-shredded—it has starches!).

Step-by-Step Directions:

Prep Cauliflower:

o  Place ⅓ cup riced cauliflower in a microwave-safe bowl. Microwave for 2 minutes. Drain, then wrap in a clean kitchen towel and squeeze firmly to remove all excess moisture.

Melt Cheese:

o  In another microwave-safe bowl, add 2 tbsp mozzarella cheese. Microwave in 20-second bursts until melted.

Mix Dough:

o  Combine the squeezed cauliflower, melted mozzarella, ½ egg yolk, 1 tbsp + 1 tsp parmesan, and 2 tbsp almond flour in a bowl. Stir until a sticky dough forms.

Chill Dough:

o  Wet your hands lightly, then shape the dough into 1–2 small balls. Place on a plate, cover, and refrigerate for 10 minutes to firm up.

Shape Gnocchi:

o  Roll each dough ball into a thin rope (about ½-inch thick) on a surface dusted with almond flour. Slice into ½-inch pieces. Press each gently with a fork to create ridges.

Rest Gnocchi:

o  Arrange shaped gnocchi on a parchment-lined tray. Refrigerate uncovered for 15–20 minutes (this prevents sticking).

Cook:

o  Bring a pot of salted water to a boil. Drop in gnocchi and cook for 60–90 seconds (they’ll float when done). Drain immediately.

Serve:

o  Toss with olive oil, keto-friendly pesto, or marinara. Optional: Pan-fry in olive oil for 1–2 minutes for a crispy finish.

Storage Instructions:

To store uncooked gnocchi dough, wrap it tightly in plastic and refrigerate for up to 2 days or freeze for 1 month. Cooked gnocchi should be cooled completely, then arranged in a single layer on a parchment-lined plate or microwave-safe bowl (covered) and refrigerated for up to 3 days.

For freezing, spread cooked gnocchi on a baking sheet until solid, transfer to a freezer-safe bag, and store for up to 6 months.

Reheat leftovers in a skillet with a drizzle of olive oil over medium heat—avoid microwaving, as the almond flour-based dough may turn rubbery. This method preserves the delicate texture of the mozzarella cheese and ensures evenly warmed, pillowy gnocchi every time.

Tips for Achieving Maximum Flavor:

For tender, flavorful keto gnocchi, patience is key: refrigerate the gnocchi dough twice—first after shaping the balls (10 minutes) and again after cutting (15–20 minutes). This firms up the almond flour base and enhances its pillowy texture.

When boiling, stick to 60–90 seconds max (overcooking softens the delicate mozzarella cheese binder). Cook in small batches to keep water boiling vigorously, ensuring even cooking. If the dough feels crumbly, mix in a teaspoon of water or olive oil to bind it.

For meal prep, store uncooked dough in a microwave-safe bowl (tightly wrapped) for up to two days. Finally, skip the microwave when reheating—pan-fry leftovers in olive oil for a golden, crispy finish that revives the gnocchi’s richness

Frequently Asked Questions:

Can I substitute almond flour with coconut flour?

No—almond flour provides necessary structure and moisture. Coconut flour is too absorbent and will dry out the gnocchi dough.

Why refrigerate the dough twice?

Chilling prevents the mozzarella cheese from softening too quickly, ensuring the dough holds its shape during shaping and cooking.

Can I freeze uncooked gnocchi?

Yes! Freeze them on a tray first, then transfer to a bag. Boil directly from frozen, adding 15–30 seconds to the cook time.

Why avoid microwaving leftovers?

Microwaving can make the almond flour base gummy. Reheat in a skillet with olive oil for crisp edges and even warmth.

Is this recipe dairy-free?

Not as written—swap mozzarella cheese for vegan melty cheese and omit parmesan for a dairy-free version.

Keto gnocchi

Prep Time 29 minutes
Cook Time 4 minutes
Total Time 24 minutes
Course Main Course
Cuisine American
Servings 1

Ingredients
  

  • · ⅓ cup riced cauliflower – Fresh or store-bought raw and patted very dry (excess moisture ruins the dough!).
  • · ½ large egg yolk – Crack a yolk into a bowl whisk lightly, and use half (freeze the rest for later!).
  • · 1 tbsp + 1 tsp freshly grated parmesan – Skip the shelf-stable stuff; fresh grating melts better.
  • · 2 tbsp blanched almond flour – Not almond meal it’s too gritty for single-serving dough!.
  • · 2 tbsp shredded mozzarella – Low-moisture works best no pre-shredded—it has starches!.

Instructions
 

  • Prep Cauliflower:
  • o Place ⅓ cup riced cauliflower in a microwave-safe bowl. Microwave for 2 minutes. Drain, then wrap in a clean kitchen towel and squeeze firmly to remove all excess moisture.
  • Melt Cheese:
  • o In another microwave-safe bowl, add 2 tbsp mozzarella cheese. Microwave in 20-second bursts until melted.
  • Mix Dough:
  • o Combine the squeezed cauliflower, melted mozzarella, ½ egg yolk, 1 tbsp + 1 tsp parmesan, and 2 tbsp almond flour in a bowl. Stir until a sticky dough forms.
  • Chill Dough:
  • o Wet your hands lightly, then shape the dough into 1–2 small balls. Place on a plate, cover, and refrigerate for 10 minutes to firm up.
  • Shape Gnocchi:
  • o Roll each dough ball into a thin rope (about ½-inch thick) on a surface dusted with almond flour. Slice into ½-inch pieces. Press each gently with a fork to create ridges.
  • Rest Gnocchi:
  • o Arrange shaped gnocchi on a parchment-lined tray. Refrigerate uncovered for 15–20 minutes (this prevents sticking).
  • Cook:
  • o Bring a pot of salted water to a boil. Drop in gnocchi and cook for 60–90 seconds (they’ll float when done). Drain immediately.
  • Serve:
  • o Toss with olive oil, keto-friendly pesto, or marinara. Optional: Pan-fry in olive oil for 1–2 minutes for a crispy finish.

Keto Chicken Tortilla Soup: A Flavorful Low-Carb Comfort Food

Comforting bowl of soup that fits perfectly into your keto lifestyle? Look no further than this Keto Chicken Tortilla Soup! Packed with tender chicken, bold spices, and a rich broth, this soup delivers all the flavors of the classic dish without the carbs.

By swapping out high-carb ingredients for keto-friendly alternatives, this recipe is a guilt-free way to enjoy a Mexican-inspired favorite. Whether you’re meal-prepping or need a quick weeknight dinner, this soup is sure to satisfy your cravings while keeping you on track with your low-carb goals. Let’s get cooking!

Ingredients for Keto Chicken Tortilla Soup

Here’s what you’ll need to make this delicious soup:

  • 2 tablespoons olive oil (or avocado oil)
  • 1 pound boneless, skinless chicken thighs (or chicken breasts)
  • 1 medium onion, diced
  • 3 cloves garlic, minced
  • 1 bell pepper, diced (any color)
  • 1 jalapeño, seeded and minced (optional, for heat)
  • 1 can (14 oz) diced tomatoes (no sugar added)
  • 4 cups chicken broth (low-sodium preferred)
  • 1 teaspoon ground cumin
  • 1 teaspoon chili powder
  • 1 teaspoon smoked paprika
  • ½ teaspoon dried oregano
  • ½ teaspoon sea salt
  • ¼ teaspoon black pepper
  • 1 cup shredded cheddar cheese (for topping)
  • 1 avocado, diced (for topping)
  • ¼ cup fresh cilantro, chopped (for garnish)
  • 1 lime, cut into wedges (for serving)

Step-by-Step Directions

1. Cook the Chicken

  1. Heat 1 tablespoon of olive oil in a large pot or Dutch oven over medium heat.
  2. Season the chicken thighs with salt and pepper, then add them to the pot. Cook for 5-6 minutes per side or until golden brown and cooked through. Remove the chicken and set aside.

2. Sauté the Vegetables

  1. In the same pot, add the remaining olive oil. Sauté the diced onion, garlic, bell pepper, and jalapeño (if using) for 4-5 minutes, or until softened.

3. Add the Spices and Broth

  1. Stir in the ground cumin, chili powder, smoked paprika, dried oregano, salt, and black pepper. Cook for 1-2 minutes to toast the spices and enhance their flavor.
  2. Pour in the diced tomatoes (with their juices) and chicken broth. Stir to combine.

4. Simmer the Soup

  1. Bring the soup to a boil, then reduce the heat to low. Let it simmer for 15-20 minutes to allow the flavors to meld together.

5. Shred the Chicken

  1. While the soup simmers, shred the cooked chicken using two forks.

6. Combine and Serve

  1. Add the shredded chicken back to the pot and stir to combine. Simmer for an additional 5 minutes.
  2. Ladle the soup into bowls and top with shredded cheddar cheese, diced avocado, and fresh cilantro. Serve with lime wedges on the side for a bright, tangy finish.

Storage Instructions

This Keto Chicken Tortilla Soup stores beautifully for meal prep or leftovers. Let the soup cool completely before transferring it to an airtight container. It can be refrigerated for up to 4 days or frozen for up to 3 months. To reheat, simply warm it on the stovetop over medium heat or in the microwave until heated through. Add fresh toppings like avocado and cilantro just before serving to maintain their texture and flavor.

Tips for Achieving Maximum Flavor

  1. Use Chicken Thighs: Chicken thighs are more flavorful and tender than breasts, making them ideal for this soup.
  2. Toast the Spices: Sautéing the spices with the vegetables helps release their essential oils, deepening the flavor of the soup.
  3. Add Lime Juice: A squeeze of fresh lime juice before serving adds a bright, zesty note that balances the richness of the broth.
  4. Customize the Heat: Adjust the level of spiciness by adding more or less jalapeño, or even a pinch of cayenne pepper.
  5. Garnish Generously: Don’t skip the toppings! Cheese, avocado, and cilantro add layers of flavor and texture that make this soup truly special.

Frequently Asked Questions

1. Can I use rotisserie chicken for this recipe?
Yes, rotisserie chicken is a great time-saving option. Simply shred the cooked chicken and add it to the soup during the last 5 minutes of simmering.

2. Is this soup spicy?
The level of spiciness can be adjusted to your preference. Omit the jalapeño or reduce the chili powder for a milder version.

3. Can I make this soup in a slow cooker?
Absolutely! Sauté the vegetables and spices first, then transfer everything (except the toppings) to a slow cooker. Cook on low for 6-8 hours or on high for 3-4 hours.

4. What can I use instead of tomatoes?
If you prefer to avoid tomatoes, you can use a small amount of tomato paste or substitute with roasted red peppers for a different flavor profile.

5. How can I make this soup even lower in carbs?
To reduce carbs further, skip the onions or use a smaller amount, and ensure your chicken broth and diced tomatoes are free of added sugars.

Keto Chicken Tortilla Soup: A Flavorful Low-Carb Comfort Food

This keto-friendly chicken tortilla soup is a delicious and hearty meal perfect for any occasion.
Prep Time 10 minutes
Cook Time 25 minutes
Course Main Course
Cuisine Mexican
Servings 4 people

Ingredients
  

Ingredients for Keto Chicken Tortilla Soup

  • 2 tablespoons olive oil or avocado oil
  • 1 pound boneless skinless chicken thighs (or chicken breasts)
  • 1 medium onion diced
  • 3 cloves garlic minced
  • 1 bell pepper diced (any color)
  • 1 jalapeño seeded and minced (optional, for heat)
  • 1 can 14 oz diced tomatoes (no sugar added)
  • 4 cups chicken broth low-sodium preferred
  • 1 teaspoon ground cumin
  • 1 teaspoon chili powder
  • 1 teaspoon smoked paprika
  • ½ teaspoon dried oregano
  • ½ teaspoon sea salt
  • ¼ teaspoon black pepper
  • 1 cup shredded cheddar cheese for topping
  • 1 avocado diced (for topping)
  • ¼ cup fresh cilantro chopped (for garnish)
  • 1 lime cut into wedges (for serving)

Instructions
 

Step-by-Step Directions

  • Cook the Chicken
  • Heat 1 tablespoon of olive oil in a large pot or Dutch oven over medium heat.
  • Season the chicken thighs with salt and pepper, then add them to the pot. Cook for 5-6 minutes per side or until golden brown and cooked through. Remove the chicken and set aside.
  • Sauté the Vegetables
  • In the same pot, add the remaining olive oil. Sauté the diced onion, garlic, bell pepper, and jalapeño (if using) for 4-5 minutes, or until softened.
  • Add the Spices and Broth
  • Stir in the ground cumin, chili powder, smoked paprika, dried oregano, salt, and black pepper. Cook for 1-2 minutes to toast the spices and enhance their flavor.
  • Pour in the diced tomatoes (with their juices) and chicken broth. Stir to combine.
  • Simmer the Soup
  • Bring the soup to a boil, then reduce the heat to low. Let it simmer for 15-20 minutes to allow the flavors to meld together.
  • Shred the Chicken
  • While the soup simmers, shred the cooked chicken using two forks.
  • Combine and Serve
  • Add the shredded chicken back to the pot and stir to combine. Simmer for an additional 5 minutes.
  • Ladle the soup into bowls and top with shredded cheddar cheese, diced avocado, and fresh cilantro. Serve with lime wedges on the side for a bright, tangy finish.

Keto Beef Back Ribs: A Flavorful Low-Carb Feast

When it comes to satisfying, hearty meals that fit perfectly into a keto lifestyle, Keto Beef Back Ribs are a game-changer. These tender, fall-off-the-bone ribs are packed with rich, smoky flavors and are incredibly easy to prepare.

Whether you’re hosting a weekend barbecue or simply craving a comforting dinner, this recipe is sure to impress. With a simple dry rub and slow cooking method, these ribs are not only low-carb but also bursting with savory goodness. Let’s dive into this delicious keto-friendly dish that will have everyone asking for seconds!


Ingredients for Keto Beef Back Ribs

Here’s what you’ll need to make these mouthwatering ribs:

  • 2-3 pounds beef back ribs (bone-in for maximum flavor)
  • 2 tablespoons olive oil (or avocado oil)
  • 1 tablespoon smoked paprika
  • 1 tablespoon garlic powder
  • 1 tablespoon onion powder
  • 1 teaspoon chili powder (adjust for spice preference)
  • 1 teaspoon dried thyme
  • 1 teaspoon dried oregano
  • 1 teaspoon sea salt
  • ½ teaspoon black pepper
  • ½ teaspoon cayenne pepper (optional, for a kick)
  • 1 cup sugar-free barbecue sauce (or keto-friendly marinade)

Step-by-Step Directions

1. Prepare the Dry Rub
  1. In a small bowl, combine the smoked paprika, garlic powder, onion powder, chili powder, dried thyme, dried oregano, sea salt, black pepper, and cayenne pepper (if using). Mix well to create a flavorful dry rub.
2. Season the Ribs
  1. Pat the beef back ribs dry with paper towels to ensure the rub sticks well.
  2. Drizzle the ribs with olive oil, then generously coat them with the dry rub, massaging it into the meat on all sides. Let the ribs sit at room temperature for 20-30 minutes to allow the flavors to penetrate.
3. Cook the Ribs
  1. Preheat your oven to 300°F (150°C).
  2. Place the seasoned ribs on a baking sheet lined with aluminum foil or a wire rack for even cooking.
  3. Cover the ribs tightly with foil to lock in moisture and bake for 2.5 to 3 hours, or until the meat is tender and easily pulls away from the bone.
4. Add the Finishing Touch
  1. Remove the ribs from the oven and carefully uncover them.
  2. Brush the ribs with your favorite sugar-free barbecue sauce or keto-friendly marinade.
  3. Increase the oven temperature to 400°F (200°C) and return the ribs to the oven, uncovered, for 10-15 minutes to caramelize the sauce.
5. Serve and Enjoy
  1. Let the ribs rest for 5-10 minutes before slicing. Serve with extra barbecue sauce on the side and your favorite keto-friendly sides, like coleslaw or cauliflower mash.

Storage Instructions

To store leftover Keto Beef Back Ribs, let them cool completely before transferring them to an airtight container. They can be refrigerated for up to 3-4 days. For reheating, place the ribs in a preheated oven at 350°F (175°C) for 10-15 minutes, or until warmed through. Avoid microwaving, as it can dry out the meat. If you’d like to keep the ribs longer, you can freeze them in a freezer-safe container for up to 2 months. Thaw in the refrigerator overnight before reheating.


Tips for Achieving Maximum Flavor

  1. Choose Quality Ribs: Opt for well-marbled beef back ribs for the juiciest and most flavorful results.
  2. Don’t Skip the Dry Rub: Letting the ribs sit with the dry rub allows the spices to deeply flavor the meat.
  3. Low and Slow Cooking: Cooking the ribs at a low temperature for several hours ensures they become tender and fall-off-the-bone delicious.
  4. Caramelize the Sauce: Broiling or baking the ribs at a higher temperature after adding the sauce creates a sticky, flavorful glaze.
  5. Experiment with Sauces: Try different keto-friendly sauces, such as a tangy mustard-based sauce or a spicy chipotle marinade, to switch up the flavor profile.

Frequently Asked Questions

1. Can I use a different cut of beef for this recipe?

While beef back ribs are ideal for their tenderness and flavor, you can also use beef short ribs. Adjust the cooking time as needed to ensure they become tender.

2. Is this recipe suitable for grilling?

Yes! After seasoning, you can grill the ribs over indirect heat for 2-3 hours, basting with sauce during the last 15 minutes of cooking.

3. Can I make these ribs in a slow cooker?

Absolutely. Place the seasoned ribs in a slow cooker and cook on low for 6-8 hours or on high for 3-4 hours. Finish under the broiler with sauce for a caramelized crust.

4. What sides pair well with keto beef back ribs?

Great keto-friendly sides include cauliflower mac and cheese, grilled asparagus, or a fresh avocado salad.

5. How do I know when the ribs are done?

The ribs are done when the meat easily pulls away from the bone and reaches an internal temperature of 190-203°F (88-95°C).


This Keto Beef Back Ribs recipe is a must-try for anyone following a low-carb lifestyle. With its bold flavors and simple preparation, it’s a dish that will quickly become a family favorite. Enjoy the rich, smoky taste of perfectly cooked ribs without compromising your keto goals!

Keto Beef Back Ribs: A Flavorful Low-Carb Feast

Savor the rich, smoky flavor of keto beef back ribs, perfectly seasoned and slow-cooked to achieve mouthwatering tenderness.
Prep Time 10 minutes
Cook Time 4 hours
Course Main Course
Cuisine American
Servings 4 people

Ingredients
  

Ingredients for Keto Beef Back Ribs

  • 2-3 pounds beef back ribs
  • 2 tablespoons olive oil
  • 1 tablespoon smoked paprika
  • 1 tablespoon garlic powder
  • 1 tablespoon onion powder
  • 1 teaspoon chili powder adjust for spice preference
  • 1 teaspoon dried thyme
  • 1 teaspoon dried oregano
  • 1 teaspoon sea salt
  • ½ teaspoon black pepper
  • ½ teaspoon cayenne pepper optional, for a kick
  • 1 cup sugar-free barbecue sauce or keto-friendly marinade

Instructions
 

Step-by-Step Directions

  • Prepare the Dry Rub
  • In a small bowl, combine the smoked paprika, garlic powder, onion powder, chili powder, dried thyme, dried oregano, sea salt, black pepper, and cayenne pepper (if using). Mix well to create a flavorful dry rub.
  • Season the Ribs
  • Pat the beef back ribs dry with paper towels to ensure the rub sticks well.
  • Drizzle the ribs with olive oil, then generously coat them with the dry rub, massaging it into the meat on all sides. Let the ribs sit at room temperature for 20-30 minutes to allow the flavors to penetrate.
  • Cook the Ribs
  • Preheat your oven to 300°F (150°C).
  • Place the seasoned ribs on a baking sheet lined with aluminum foil or a wire rack for even cooking.
  • Cover the ribs tightly with foil to lock in moisture and bake for 2.5 to 3 hours, or until the meat is tender and easily pulls away from the bone.
  • Add the Finishing Touch
  • Remove the ribs from the oven and carefully uncover them.
  • Brush the ribs with your favorite sugar-free barbecue sauce or keto-friendly marinade.
  • Increase the oven temperature to 400°F (200°C) and return the ribs to the oven, uncovered, for 10-15 minutes to caramelize the sauce.
  • Serve and Enjoy
  • Let the ribs rest for 5-10 minutes before slicing. Serve with extra barbecue sauce on the side and your favorite keto-friendly sides, like coleslaw or cauliflower mash.

Low-Carb Spaghetti Squash and Meatballs: A Delicious Keto Dinner Idea

Craving a comforting Italian-inspired dinner without the carbs? Look no further than this Low-Carb Spaghetti Squash and Meatballs recipe! Perfect for keto enthusiasts, this dish combines tender roasted spaghetti squash with flavorful beef meatballs, creating a hearty and satisfying meal that’s both healthy and delicious. The natural strands of spaghetti squash, baked to perfection in spaghetti squash boats, serve as the ideal low-carb alternative to traditional pasta.

Low-carb spaghetti squash served with homemade meatballs and marinara sauce, garnished with Parmesan and fresh basil.

Seasoned with aromatic Italian seasoning and topped with a sprinkle of grated parmesan, every bite is bursting with flavor. Using ground beef for the meatballs ensures a rich, savory taste, while the squash’s cut side caramelizes slightly in the oven, adding a touch of sweetness to balance the dish. Whether you’re new to squash recipes or a seasoned pro, this squash and meatballs combo is sure to become a keto dinner favorite. Let’s dive into this easy, wholesome recipe that’s perfect for busy weeknights or cozy family dinners!

Ingredients for Low-Carb Spaghetti Squash and Meatballs

For the Spaghetti Squash:
  • 1 medium spaghetti squash (about 3-4 pounds)
  • 1 tablespoon olive oil (or avocado oil)
  • ½ teaspoon garlic powder
  • ½ teaspoon Italian seasoning
  • Salt and black pepper, to taste
For the Beef Meatballs:
  • 1 pound ground beef (80/20 blend for juiciness)
  • ¼ cup almond flour (or pork rind crumbs for a nut-free option)
  • 1 large egg
  • 2 cloves garlic, minced
  • 1 teaspoon Italian seasoning
  • ½ teaspoon onion powder
  • ¼ cup freshly grated parmesan cheese
  • 2 tablespoons chopped fresh parsley (optional, for added flavor)
  • Salt and black pepper, to taste
For Serving:
  • 1 cup low-carb marinara sauce (sugar-free)
  • ¼ cup grated parmesan cheese (for topping)
  • Fresh basil or parsley, chopped (for garnish)

Step-by-Step Directions

1. Prepare the Spaghetti Squash
  1. Preheat your oven to 400°F (200°C).
  2. Carefully cut the spaghetti squash in half lengthwise using a sharp knife. Scoop out the seeds and stringy pulp with a spoon.
  3. Drizzle the cut side of each squash half with olive oil, then season with garlic powder, Italian seasoning, salt, and black pepper.
  4. Place the squash halves cut side down on a baking sheet lined with parchment paper.
  5. Roast in the preheated oven for 35-40 minutes, or until the squash is tender and easily shreds into strands with a fork.
2. Make the Beef Meatballs
  1. While the squash is roasting, prepare the meatballs. In a large mixing bowl, combine the ground beef, almond flour, egg, minced garlic, Italian seasoning, onion powder, grated parmesan, chopped parsley (if using), salt, and black pepper.
  2. Mix the ingredients gently with your hands until well combined. Avoid overmixing to keep the meatballs tender.
  3. Shape the mixture into 12-14 evenly sized beef meatballs, about 1.5 inches in diameter.
3. Cook the Meatballs
  1. Heat a large skillet over medium heat and add a drizzle of olive oil.
  2. Place the meatballs in the skillet, leaving space between each one. Cook for 8-10 minutes, turning occasionally, until browned on all sides and cooked through.
  3. Remove the meatballs from the skillet and set aside.
4. Shred the Spaghetti Squash
  1. Once the squash is done roasting, remove it from the oven and let it cool slightly.
  2. Use a fork to scrape the flesh of the squash into strands, creating the spaghetti squash boats.
5. Assemble the Dish
  1. In the same skillet used for the meatballs, heat the low-carb marinara sauce over medium heat. Add the cooked meatballs to the sauce and simmer for 2-3 minutes to combine the flavors.
  2. Divide the shredded roasted spaghetti squash between plates or serve directly in the squash boats for a fun presentation.
  3. Top the squash with the saucy meatballs and a generous sprinkle of grated parmesan.
  4. Garnish with fresh basil or parsley for a pop of color and added freshness.
6. Serve and Enjoy!
  • Serve your Low-Carb Spaghetti Squash and Meatballs immediately while warm. This dish pairs perfectly with a side salad or steamed vegetables for a complete keto-friendly meal.

Storage Instructions:

To store your Low-Carb Spaghetti Squash and Meatballs, let the dish cool completely before transferring it to an airtight container. The roasted spaghetti squash and beef meatballs can be refrigerated separately or together for up to 3-4 days. If storing in spaghetti squash boats, wrap them tightly in plastic wrap or aluminum foil to maintain freshness. When ready to enjoy, reheat the squash and meatballs in the oven at 350°F (175°C) until warmed through, or use the microwave for a quick option. For the best texture, avoid overcooking during reheating. This dish is perfect for meal prep, as the flavors deepen over time, making it an even tastier keto-friendly option for busy days!

Low-carb spaghetti squash served with homemade meatballs and marinara sauce, garnished with Parmesan and fresh basil.

Low-Carb Spaghetti Squash and Meatballs: A Delicious Keto Dinner Idea

This mouthwatering low-carb spaghetti squash and meatballs dish is the perfect keto-friendly alternative to traditional pasta.
Prep Time 20 minutes
Cook Time 20 minutes
Course Main Course
Cuisine Italian
Servings 4 people

Ingredients
  

Ingredients for Low-Carb Spaghetti Squash and Meatballs

  • For the Spaghetti Squash:
  • 1 medium spaghetti squash
  • 1 tablespoon olive oil
  • ½ teaspoon garlic powder
  • ½ teaspoon Italian seasoning
  • Salt and black pepper
  • For the Beef Meatballs:
  • 1 pound ground beef
  • ¼ cup almond flour
  • 1 large egg
  • 2 cloves garlic
  • 1 teaspoon Italian seasoning
  • ½ teaspoon onion powder
  • ¼ cup freshly grated parmesan cheese
  • 2 tablespoons chopped fresh parsley
  • Salt and black pepper
  • For Serving:
  • 1 cup low-carb marinara sauce
  • ¼ cup grated parmesan cheese
  • Fresh basil or parsley

Instructions
 

Step-by-Step Directions

    Prepare the Spaghetti Squash

    • Preheat your oven to 400°F (200°C).
    • Carefully cut the spaghetti squash in half lengthwise using a sharp knife. Scoop out the seeds and stringy pulp with a spoon.
    • Drizzle the cut side of each squash half with olive oil, then season with garlic powder, Italian seasoning, salt, and black pepper.
    • Place the squash halves cut side down on a baking sheet lined with parchment paper.
    • Roast in the preheated oven for 35-40 minutes, or until the squash is tender and easily shreds into strands with a fork.

    Make the Beef Meatballs

    • While the squash is roasting, prepare the meatballs. In a large mixing bowl, combine the ground beef, almond flour, egg, minced garlic, Italian seasoning, onion powder, grated parmesan, chopped parsley (if using), salt, and black pepper.
    • Mix the ingredients gently with your hands until well combined. Avoid overmixing to keep the meatballs tender.
    • Shape the mixture into 12-14 evenly sized beef meatballs, about 1.5 inches in diameter.

    Cook the Meatballs

    • Heat a large skillet over medium heat and add a drizzle of olive oil.
    • Place the meatballs in the skillet, leaving space between each one. Cook for 8-10 minutes, turning occasionally, until browned on all sides and cooked through.
    • Remove the meatballs from the skillet and set aside.

    Shred the Spaghetti Squash

    • Once the squash is done roasting, remove it from the oven and let it cool slightly.
    • Use a fork to scrape the flesh of the squash into strands, creating the spaghetti squash boats.

    Assemble the Dish

    • In the same skillet used for the meatballs, heat the low-carb marinara sauce over medium heat. Add the cooked meatballs to the sauce and simmer for 2-3 minutes to combine the flavors.
    • Divide the shredded roasted spaghetti squash between plates or serve directly in the squash boats for a fun presentation.
    • Top the squash with the saucy meatballs and a generous sprinkle of grated parmesan.
    • Garnish with fresh basil or parsley for a pop of color and added freshness.

    Serve and Enjoy!

    • Serve your Low-Carb Spaghetti Squash and Meatballs immediately while warm. This dish pairs perfectly with a side salad or steamed vegetables for a complete keto-friendly meal.

    Creamy Spaghetti Squash Alfredo Recipe: Perfect for Your Keto Diet

    If you’re looking for a delicious, low-carb alternative to traditional pasta, this Creamy Spaghetti Squash Alfredo Recipe is perfect for your keto diet! Spaghetti squash is a versatile vegetable that transforms into tender, noodle-like strands of spaghetti when cooked, making it an ideal base for this rich and satisfying dish.

    Spaghetti squash Alfredo served in a bowl with creamy Parmesan sauce and garnished with parsley.

    To start, you’ll cook spaghetti squash by roasting it on a baking sheet until the cut sides are tender and easily scraped into fluffy strands. The result? A spaghetti squash boat that’s ready to be stuffed with a velvety, keto-friendly Alfredo sauce made with almond milk, garlic, and Parmesan cheese. Seasoned with just a pinch of salt and pepper, this dish is simple yet bursting with flavor. Serve it as a main course or pair it with a fresh side salad for a complete, guilt-free meal. Whether you’re new to keto or a seasoned pro, this stuffed spaghetti squash recipe is sure to become a favorite in your healthy eating rotation!

    Ingredients for Creamy Spaghetti Squash Alfredo (Keto-Friendly):

    • 1 medium spaghetti squash (about 2-3 pounds)
    • 1 tablespoon olive oil (or avocado oil)
    • 1 teaspoon salt (divided, for seasoning)
    • 1/2 teaspoon black pepper (divided, for seasoning)
    • 2 tablespoons unsalted butter (or ghee for a richer flavor)
    • 3 cloves garlic (minced)
    • 1 cup unsweetened almond milk (or heavy cream for a creamier texture)
    • 1/2 cup grated Parmesan cheese (plus extra for garnish)
    • 1/4 teaspoon nutmeg (optional, for a hint of warmth)
    • 1/4 cup cream cheese (softened, for added creaminess)
    • Fresh parsley (chopped, for garnish)

    This simple yet flavorful ingredient list ensures your Creamy Spaghetti Squash Alfredo is keto-friendly, low-carb, and absolutely delicious!

    Step-by-Step Directions for Creamy Spaghetti Squash Alfredo (Keto-Friendly):

    1. Preheat the Oven:

    Preheat your oven to 400°F (200°C) and line a baking sheet with parchment paper or lightly grease it to prevent sticking.

    1. Prepare the Spaghetti Squash:

      Carefully cut the spaghetti squash in half lengthwise using a sharp knife. Scoop out the seeds and stringy pulp from the center using a spoon.

    2. Season and Roast:

      Drizzle the cut sides of the squash with olive oil and season generously with 1/2 teaspoon salt and 1/4 teaspoon black pepper. Place the squash halves cut-side down on the prepared baking sheet. Roast in the preheated oven for 35-40 minutes, or until the squash is tender and easily pierced with a fork.

    3. Scrape the Squash:

      Once the squash is cooked, remove it from the oven and let it cool slightly. Use a fork to scrape the flesh into strands of spaghetti, transferring them to a bowl. Set aside.

    4. Make the Alfredo Sauce:

      In a medium saucepan, melt the butter over medium heat. Add the minced garlic and sauté for 1-2 minutes until fragrant. Pour in the unsweetened almond milk (or heavy cream) and bring the mixture to a gentle simmer.

    5. Add Creaminess and Flavor:

      Reduce the heat to low and stir in the cream cheese until fully melted and smooth. Gradually add the grated Parmesan cheese, stirring constantly until the sauce thickens. Season with the remaining 1/2 teaspoon salt, 1/4 teaspoon black pepper, and nutmeg (if using).

    6. Combine Squash and Sauce:

      Add the strands of spaghetti squash to the Alfredo sauce, gently tossing to coat them evenly. Cook for 2-3 minutes until everything is heated through.

    7. Serve and Garnish:

      Transfer the creamy spaghetti squash Alfredo to a serving dish or back into the spaghetti squash boat for a fun presentation. Garnish with additional Parmesan cheese and fresh parsley.

    8. Optional Side:

      Pair this dish with a fresh side salad for a complete, keto-friendly meal.

    Enjoy your Creamy Spaghetti Squash Alfredo—a low-carb, keto-approved twist on a classic comfort food!

    Storage Instructions:

    To store your Creamy Spaghetti Squash Alfredo, let it cool completely before transferring it to an airtight container. It will stay fresh in the refrigerator for up to 3-4 days. When reheating, gently warm it in a skillet over medium heat, adding a splash of unsweetened almond milk or water to restore its creamy consistency. Avoid microwaving for too long, as it can cause the sauce to separate. For the best texture and flavor, enjoy your leftovers within a couple of days. If you’ve prepared extra spaghetti squash strands, store them separately in the fridge and mix them with the sauce just before serving to maintain their firmness.

    Tips for Achieving Maximum Flavor:

    To elevate your Creamy Spaghetti Squash Alfredo, start by roasting the spaghetti squash until it’s caramelized and tender—this enhances its natural sweetness and adds depth to the dish. For the Alfredo sauce, use freshly grated Parmesan cheese instead of pre-packaged varieties, as it melts more smoothly and delivers a richer taste. Sauté the garlic in butter until fragrant but not browned to avoid bitterness, and don’t skip the pinch of nutmeg—it adds a subtle warmth that complements the creamy sauce perfectly. Finally, garnish with a sprinkle of fresh herbs like parsley or basil for a bright, finishing touch. These small steps will ensure your keto-friendly meal is bursting with flavor!

    Frequently Asked Questions:

    1. Can I use heavy cream instead of almond milk in this recipe?
    Absolutely! Heavy cream is a great substitute for unsweetened almond milk if you prefer a richer, creamier texture. Just keep in mind that it will add a few extra calories and fat, but it’s still keto-friendly.

    2. How do I know when the spaghetti squash is fully cooked?
    The squash is ready when the cut sides are tender and easily pierced with a fork. The flesh should scrape into strands of spaghetti effortlessly. If it’s still firm, return it to the oven for a few more minutes.

    3. Can I prepare the spaghetti squash ahead of time?
    Yes! You can roast the squash and scrape out the strands of spaghetti a day in advance. Store them in an airtight container in the fridge and mix with the Alfredo sauce when ready to serve.

    4. Is this recipe suitable for meal prep?
    Definitely! This dish stores well in the fridge for 3-4 days. Keep the squash and sauce separate if possible, and combine them when reheating to maintain the best texture.

    5. Can I add protein to this dish?
    Of course! Grilled chicken, shrimp, or even crispy bacon make excellent additions to this Creamy Spaghetti Squash Alfredo, turning it into a heartier keto meal.

    6. What can I serve with this dish?
    Pair it with a fresh side salad or steamed vegetables for a balanced, low-carb meal. It’s also delicious on its own as a satisfying main course.

    These tips and answers should help you master this Creamy Spaghetti Squash Alfredo recipe while keeping it perfectly aligned with your keto lifestyle!

    Spaghetti squash Alfredo served in a bowl with creamy Parmesan sauce and garnished with parsley.

    Creamy Spaghetti Squash Alfredo Recipe: Perfect for Your Keto Diet

    Made with tender spaghetti squash and a luscious, cheesy Alfredo sauce, this keto-friendly meal is packed with flavor while keeping your carb intake in check.
    Prep Time 15 minutes
    Cook Time 1 hour 15 minutes
    Course Main Course
    Cuisine Italian

    Ingredients
      

    Ingredients

    • 1 medium spaghetti squash about 2-3 pounds
    • 1 tablespoon olive oil or avocado oil
    • 1 teaspoon salt divided, for seasoning
    • ½ teaspoon black pepper divided, for seasoning
    • 2 tablespoons unsalted butter or ghee for a richer flavor
    • 3 cloves garlic minced
    • 1 cup unsweetened almond milk or heavy cream for a creamier texture
    • ½ cup grated Parmesan cheese plus extra for garnish
    • ¼ teaspoon nutmeg optional, for a hint of warmth
    • ¼ cup cream cheese softened, for added creaminess
    • Fresh parsley chopped, for garnish

    Instructions
     

    Step-by-Step Directions

      Preheat the Oven:

      • Preheat your oven to 400°F (200°C) and line a baking sheet with parchment paper or lightly grease it to prevent sticking.

      Prepare the Spaghetti Squash:

      • Carefully cut the spaghetti squash in half lengthwise using a sharp knife. Scoop out the seeds and stringy pulp from the center using a spoon.

      Season and Roast:

      • Drizzle the cut sides of the squash with olive oil and season generously with 1/2 teaspoon salt and 1/4 teaspoon black pepper. Place the squash halves cut-side down on the prepared baking sheet. Roast in the preheated oven for 35-40 minutes, or until the squash is tender and easily pierced with a fork.

      Scrape the Squash:

      • Once the squash is cooked, remove it from the oven and let it cool slightly. Use a fork to scrape the flesh into strands of spaghetti, transferring them to a bowl. Set aside.

      Make the Alfredo Sauce:

      • In a medium saucepan, melt the butter over medium heat. Add the minced garlic and sauté for 1-2 minutes until fragrant. Pour in the unsweetened almond milk (or heavy cream) and bring the mixture to a gentle simmer.

      Add Creaminess and Flavor:

      • Reduce the heat to low and stir in the cream cheese until fully melted and smooth. Gradually add the grated Parmesan cheese, stirring constantly until the sauce thickens. Season with the remaining 1/2 teaspoon salt, 1/4 teaspoon black pepper, and nutmeg (if using).

      Combine Squash and Sauce:

      • Add the strands of spaghetti squash to the Alfredo sauce, gently tossing to coat them evenly. Cook for 2-3 minutes until everything is heated through.

      Serve and Garnish:

      • Transfer the creamy spaghetti squash Alfredo to a serving dish or back into the spaghetti squash boat for a fun presentation. Garnish with additional Parmesan cheese and fresh parsley.

      Optional Side:

      • Pair this dish with a fresh side salad for a complete, keto-friendly meal.
      • Enjoy your Creamy Spaghetti Squash Alfredo—a low-carb, keto-approved twist on a classic comfort food!

      How to Make Keto Stuffed Peppers without Rice in 30 Minutes

      Craving the comforting flavors of traditional stuffed peppers but following a keto diet? Say goodbye to white rice and hello to a low-carb twist with these stuffed bell peppers without rice!

      Keto stuffed peppers filled with seasoned ground meat, cauliflower rice, cheese, and baked to perfection.

      Perfect for busy weeknights, this recipe delivers all the savory goodness of a classic meat mixture stuffed into tender bell peppers, topped with a rich tomato sauce, and baked to perfection on a baking sheet. With just 30 minutes of cooking time, you can enjoy a hearty, keto-friendly meal that’s both satisfying and easy to prepare. Whether you’re new to stuffed peppers recipes or looking for a healthier alternative, this dish is sure to become a family favorite. Let’s dive into how you can create these delicious peppers without rice on medium heat and enjoy a flavorful, low-carb dinner in no time!

      Ingredients for Keto Stuffed Peppers without Rice

      • 4 large bell peppers (any color—red, green, or yellow work great!)
      • 1 lb ground beef (or substitute with ground turkey, chicken, or pork for variety)
      • 1 small onion, finely chopped (adds flavor to the meat mixture)
      • 2 cloves garlic, minced (for a savory kick)
      • 1 cup shredded cheese (cheddar, mozzarella, or a blend—your choice!)
      • 1 cup sugar-free tomato sauce (look for a low-carb option to keep it keto-friendly)
      • 1 tbsp olive oil (for sautéing the meat mixture)
      • 1 tsp smoked paprika (adds depth to the flavor)
      • 1 tsp dried oregano (perfect for that classic stuffed pepper taste)
      • 1/2 tsp cumin (optional, but adds a warm, earthy note)
      • Salt and pepper to taste (season the meat mixture to perfection)
      • Fresh parsley or cilantro (for garnish, optional but adds a pop of color)

      Step-by-Step Directions

      Step 1: Preheat oven

      1. Preheat your oven to 375°F (190°C) and lightly grease a baking sheet or oven-safe dish.
      2. Wash 4 large bell peppers, then slice off the tops and remove the seeds and membranes. Set aside.
      Step 2: Cook the Meat Mixture
      1. Heat 1 tbsp olive oil in a large skillet over medium heat.
      2. Add 1 small chopped onion and sauté for 2-3 minutes until softened.
      3. Stir in 2 minced garlic cloves and cook for another 30 seconds until fragrant.
      4. Add 1 lb ground beef (or your preferred meat) to the skillet. Cook until browned, breaking it into small pieces with a spatula.
      5. Season the meat mixture with 1 tsp smoked paprika, 1 tsp dried oregano, 1/2 tsp cumin, and salt and pepper to taste. Mix well.
      6. Pour in 1 cup sugar-free tomato sauce and stir to combine. Let the mixture simmer for 2-3 minutes, then remove from heat.
      Step 3: Stuff the Peppers
      1. Place the hollowed-out bell peppers on the prepared baking sheet.
      2. Evenly divide the meat mixture among the peppers, packing it down gently.
      3. Top each pepper with a generous sprinkle of shredded cheese (about 1/4 cup per pepper).
      Step 4: Bake to Perfection
      1. Transfer the baking sheet to the preheated oven and bake for 20-25 minutes, or until the peppers are tender and the cheese is melted and bubbly.
      2. For a golden-brown finish, broil the peppers for 1-2 minutes at the end of the cooking time (keep an eye on them to avoid burning).
      Step 5: Serve and Enjoy
      1. Carefully remove the stuffed peppers from the oven and let them cool for 5 minutes.
      2. Garnish with fresh parsley or cilantro if desired, and serve warm.

      Storage Instructions

      To store your Keto Stuffed Peppers without Rice, let them cool completely after baking. Place the peppers in an airtight container or wrap them tightly with plastic wrap. They can be refrigerated for up to 3-4 days, making them a great option for meal prep. When you’re ready to enjoy them again, simply reheat in the oven at 350°F (175°C) for about 10-15 minutes, or until warmed through. For best results, cover the peppers with foil during reheating to prevent the cheese from drying out. This method ensures your stuffed peppers stay fresh, flavorful, and ready to serve whenever you need a quick, low-carb meal!

      Tips for Achieving Maximum Flavor

      To elevate the taste of your Keto Stuffed Peppers without Rice, start by selecting fresh, vibrant bell peppers—red or yellow varieties tend to be sweeter and add a natural depth of flavor. When preparing the meat mixture, don’t shy away from seasoning generously; a blend of smoked paprika, garlic, and oregano works wonders. For an extra burst of richness, stir in a tablespoon of cream cheese or a splash of heavy cream into the filling before stuffing the peppers. Roasting the peppers for 5-10 minutes before stuffing can also enhance their natural sweetness and texture. Finally, top with a high-quality, sharp cheddar cheese or a mix of cheeses for a gooey, flavorful finish. These small tweaks will transform your stuffed peppers into a mouthwatering, keto-friendly masterpiece!

      Frequently Asked Questions

      1. Can I use a different type of meat for this recipe?
      Absolutely! While ground beef is a popular choice, you can easily substitute it with ground turkey, chicken, or even ground pork to suit your preferences. Each option will bring its own unique flavor to the meat mixture, keeping the dish versatile and delicious.
      2. Are there any low-carb alternatives to tomato sauce?
      Yes! If you’re looking to reduce carbs further, consider using a sugar-free marinara sauce or a homemade blend of crushed tomatoes with herbs and spices. This ensures the dish stays keto-friendly while maintaining that rich, savory flavor.
      3. How can I make the peppers more tender?
      To achieve tender bell peppers, you can pre-roast them for 5-10 minutes before stuffing. Alternatively, cover the baking dish with foil during the first half of the cooking time to trap steam and soften the peppers evenly.
      4. Can I prepare these stuffed peppers ahead of time?
      Definitely! You can assemble the peppers up to a day in advance and store them covered in the fridge. When ready to bake, simply add a few extra minutes to the cooking time to ensure they’re heated through.
      5. What sides pair well with keto stuffed peppers?
      These peppers are delicious on their own, but you can pair them with a crisp green salad, steamed broccoli, or zucchini noodles for a complete low-carb meal.
      Keto stuffed peppers filled with seasoned ground meat, cauliflower rice, cheese, and baked to perfection.

      How to Make Keto Stuffed Peppers without Rice in 30 Minutes

      It's perfect for anyone following a ketogenic diet or looking for a delicious, wholesome meal.
      Prep Time 10 minutes
      Cook Time 20 minutes
      Course Main Course
      Servings 3 people

      Ingredients
        

      Ingredients

      • 4 large bell peppers any color—red, green, or yellow work great!
      • 1 lb ground beef or substitute with ground turkey, chicken, or pork for variety
      • 1 small onion finely chopped (adds flavor to the meat mixture)
      • 2 cloves garlic minced (for a savory kick)
      • 1 cup shredded cheese cheddar, mozzarella, or a blend—your choice!
      • 1 cup sugar-free tomato sauce look for a low-carb option to keep it keto-friendly
      • 1 tbsp olive oil for sautéing the meat mixture
      • 1 tsp smoked paprika adds depth to the flavor
      • 1 tsp dried oregano perfect for that classic stuffed pepper taste
      • ½ tsp cumin optional, but adds a warm, earthy note
      • Salt and pepper to taste season the meat mixture to perfection
      • Fresh parsley or cilantro for garnish, optional but adds a pop of color

      Instructions
       

      Step-by-Step Directions

      • Preheat your oven to 375°F (190°C) and lightly grease a baking sheet or oven-safe dish.
      • Wash 4 large bell peppers, then slice off the tops and remove the seeds and membranes. Set aside.
      • Step 2: Cook the Meat Mixture
      • Heat 1 tbsp olive oil in a large skillet over medium heat.
      • Add 1 small chopped onion and sauté for 2-3 minutes until softened.
      • Stir in 2 minced garlic cloves and cook for another 30 seconds until fragrant.
      • Add 1 lb ground beef (or your preferred meat) to the skillet. Cook until browned, breaking it into small pieces with a spatula.
      • Season the meat mixture with 1 tsp smoked paprika, 1 tsp dried oregano, 1/2 tsp cumin, and salt and pepper to taste. Mix well.
      • Pour in 1 cup sugar-free tomato sauce and stir to combine. Let the mixture simmer for 2-3 minutes, then remove from heat.
      • Step 3: Stuff the Peppers
      • Place the hollowed-out bell peppers on the prepared baking sheet.
      • Evenly divide the meat mixture among the peppers, packing it down gently.
      • Top each pepper with a generous sprinkle of shredded cheese (about 1/4 cup per pepper).
      • Step 4: Bake to Perfection
      • Transfer the baking sheet to the preheated oven and bake for 20-25 minutes, or until the peppers are tender and the cheese is melted and bubbly.
      • For a golden-brown finish, broil the peppers for 1-2 minutes at the end of the cooking time (keep an eye on them to avoid burning).
      • Step 5: Serve and Enjoy
      • Carefully remove the stuffed peppers from the oven and let them cool for 5 minutes.
      • Garnish with fresh parsley or cilantro if desired, and serve warm.

      Keto Crunch wrap Supreme (Under 5 Net Carbs!)

      Craving Taco Bell’s iconic Crunch wrap Supreme but staying committed to your keto lifestyle? Meet your new keto dinner obsession!

      Keto crunchwrap filled with seasoned ground beef, cheese, lettuce, and low-carb tortilla, folded and grilled to perfection.

      This tasty copycat recipe replaces heavy flour tortillas and fried corn shells. with crispy keto tortillas and a crunchy keto tostada shell.

      This change reduces net carbs but keeps the delicious texture you love. This keto crunch wrap contains seasoned beef, melted cheese, tangy sour cream, and fresh lettuce. It offers all the bold flavors of the original but without the guilt.

      Perfect for meal prep or a quick keto-friendly feast, this recipe proves you don’t have to give up fast-food favorites. This meal has only 5 net carbs per serving.

      It uses low-carb tortillas and smart ingredient swaps. it is High in fat and incredibly satisfying. This meal fits well into your macros.

      Say goodbye to FOMO and hello to a crispy, cheesy, keto-approved upgrade that tastes even better than the drive-thru!

      Fresh, Keto-Friendly Ingredients for Your Crunch wrap

      Boost your keto dinners with these smart low-carb swaps. They keep net carbs under 5g and add great flavor and crunch. Here’s your reinvented lineup:

      For the Crispy Keto Tostada Shells

      1 1/3 cups super-fine blanched almond flour (for a buttery, grain-free base)

      2 tbsp unflavored collagen peptides (adds protein + improves dough elasticity)

      1 tbsp psyllium husk powder (a gluten-free binder for flexibility)

      1/2 tsp Himalayan pink salt (enhances savory notes)

      6 tbsp steaming bone broth (replaces water for richer flavor)

      For the Flavor-Packed Fillings

      1 lb pasture-raised ground beef (higher fat for keto-friendly richness)

      2 tbsp smoky ancho chile spice blend (DIY mix: cumin, smoked paprika, garlic, cocoa powder)

      1 cup zesty “no-nacho” cheese sauce (blend sharp cheddar, coconut cream, and pickled jalapeños)

      1/2 cup tangy cultured coconut cream (dairy-free sour cream alternative)

      2 cups shredded butter lettuce (adds crispness without bitterness)

      1/2 cup charred cherry tomatoes (oven-blistered for depth)

      1 cup melty pepper jack shreds (extra gooeyness + kick)

      Essential Tools & Extras

      8 large coconut-flour keto tortillas (pre-made or homemade)

      8 mini cassava-free tostada shells (baked, not fried!)

      Cold-pressed avocado oil spray (for oil-free air fryer crispiness)

      Silicauche parchment sheets (reusable + non-stick)

      how to make keto crunch wrap

      1. Sizzle the Spiced Beef Filling

      Heat 2 tbsp avocado oil in a skillet over medium-high. Add 1 lb of ground beef, breaking it into crumbles with a spatula. Cook until deeply browned and caramelized.

      Stir in 2 tbsp smoky ancho chile spice blend (or keto taco seasoning) and 1/4 cup bone broth (or water). Reduce heat to low, cover, and simmer for 5 minutes to let flavors meld. Set aside.

      2. Craft Crispy Keto Tostada Shells

      **Dry Mix:**

      1. In a bowl, combine the following ingredients:

      – 1 1/3 cups of super-fine almond flour

      – 2 tablespoons of collagen peptides

      – 1 tablespoon of psyllium husk powder

      – 1/2 teaspoon of pink salt

      2. Whisk the ingredients together until well-mixed. Keep whisking until there are no lumps left.

      Form Dough: Pour in 6 tbsp steaming bone broth (or hot water) and stir vigorously until a smooth, pliable dough forms. Divide into 8 equal balls.

      Press & Flatten: Sandwich each ball between reusable parchment sheets. Use a tortilla press or rolling pin to flatten into thin, even circles (aim for 4-5” diameter).

      3. Fry to Golden Perfection

      Heat avocado oil (1 cm deep) in a skillet over medium. Carefully peel the parchment off a dough circle and fry for 2-3 minutes per side, pressing gently with a spatula to prevent curling.

      Fry until golden and rigid. Drain on paper towels. Repeat for all shells.

      4. Layer Your Low-Carb Masterpiece

      Base: Place a large coconut-flour keto tortilla flat. Spoon 1/3 cup spiced beef into the center, leaving a 2” border.

      Crunch Layer: Drizzle 2 tbsp keto nacho cheese sauce over the beef, then top with a crispy tostada shell.

      Fresh Toppings: Spread 1 tbsp of cultured coconut cream (or sour cream) over the shell. Add 1/2 cup butter lettuce, 1 tbsp charred cherry tomatoes, and 2 tbsp pepper jack cheese.

      Seal the Deal: Place a small keto tortilla on top. Fold the edges of the large tortilla upward, pleating tightly around the small tortilla to encase the fillings.

      5. Crisp the Crunchwrap

      Lightly spray a skillet with avocado oil and heat over medium. Place the crunch wrap seam-side down and cook for 2-3 minutes until golden and sealed. Flip and repeat on the other side.

      6. Serve & Savor

      Slice diagonally and enjoy immediately, or wrap in foil for meal prep! The melty cheese, smoky beef, and shatter-crisp shell deliver all the fast-food vibes—with just 5 net carbs per serving.

       Storage Instructions

      To keep your keto crunch wrap fresh and crispy, store it unassembled. You can also wrap it tightly in parchment paper. This helps prevent sogginess.

      Place it in an airtight container in the fridge. It will stay good for up to 2 days. For the best results, store the components separately.

      Keep the seasoned beef and keto tostada shells in glass containers. Add crisp lettuce, diced tomatoes, and chilled cheese just before reheating.

      To refresh leftovers, crisp the shell and tortilla in a preheated oven at 350°F for 5 to 7 minutes. Then, add cool toppings to reassemble. Avoid microwaving—opt for an air fryer (3-4 minutes at 375°F) to lock in that signature crunch while keeping net carbs in check. This is Perfect for keto meal prep without the freezer!

      FAQ

      Q: Can I substitute almond flour with another keto-friendly flour?

      Sure! You can use sunflower seed flour or coconut flour.

      Use 1/3 cup and add one extra egg. Adjust the liquids if needed. The dough should feel soft and flexible, not crumbly.

      Q: Why add collagen peptides to the tostada shells?

      Collagen increases protein, makes the dough more elastic, and helps joint health. Great for a gut-friendly keto dinner!

      Q: How do I prevent the crunch wrap from falling apart during frying?

      A: Press the folded edges firmly and let the seam side cook first to “seal” the wrap. A well-pressed tortilla and minimal filling spillage are key!

      Q: Are the net carbs accurate if I use store-bought keto tortillas?

      A: Always check labels—brands vary. Homemade shells typically have fewer hidden carbs, but most store-bought low-carb tortillas keep it under 5g net carbs each.

      Keto crunchwrap filled with seasoned ground beef, cheese, lettuce, and low-carb tortilla, folded and grilled to perfection.

      Keto Crunch wrap Supreme (Under 5 Net Carbs!)

      Prep Time 20 minutes
      Cook Time 20 minutes
      Total Time 40 minutes
      Course Main Course
      Cuisine Mexican

      Ingredients
        

      For the Crispy Keto Tostada Shells

      • 1 ⅓ cups super-fine blanched almond flour for a buttery, grain-free base
      • 2 tbsp unflavored collagen peptides adds protein + improves dough elasticity
      • 1 tbsp psyllium husk powder a gluten-free binder for flexibility
      • ½ tsp Himalayan pink salt enhances savory notes
      • 6 tbsp steaming bone broth replaces water for richer flavor

      For the Flavor-Packed Fillings

      • 1 lb pasture-raised ground beef higher fat for keto-friendly richness
      • 2 tbsp smoky ancho chile spice blend DIY mix: cumin, smoked paprika, garlic, cocoa powder
      • 1 cup zesty "no-nacho" cheese sauce blend sharp cheddar, coconut cream, and pickled jalapeños
      • ½ cup tangy cultured coconut cream dairy-free sour cream alternative
      • 2 cups shredded butter lettuce adds crispness without bitterness
      • ½ cup charred cherry tomatoes oven-blistered for depth
      • 1 cup melty pepper jack shreds extra gooeyness + kick

      Essential Tools & Extras

      • 8 large coconut-flour keto tortillas pre-made or homemade
      • 8 mini cassava-free tostada shells baked, not fried!
      • Cold-pressed avocado oil spray for oil-free air fryer crispiness
      • Silicauche parchment sheets reusable + non-stick

      Instructions
       

      • Step-by-Step Directions for Keto Crunchwrap Supreme (Crispy, Cheesy, & 100% Original!)
      • Sizzle the Spiced Beef Filling
      • Heat 2 tbsp avocado oil in a skillet over medium-high. Add 1 lb ground beef, breaking it into crumbles with a spatula. Cook until deeply browned and caramelized.
      • Stir in 2 tbsp smoky ancho chile spice blend (or keto taco seasoning) and 1/4 cup bone broth (or water). Reduce heat to low, cover, and simmer for 5 minutes to let flavors meld. Set aside.
      • Craft Crispy Keto Tostada Shells
      • **Dry Mix:**
      • In a bowl, combine the following ingredients:
      • - 1 1/3 cups of super-fine almond flour
      • - 2 tablespoons of collagen peptides
      • - 1 tablespoon of psyllium husk powder
      • - 1/2 teaspoon of pink salt
      • Whisk the ingredients together until well mixed. Keep whisking until there are no lumps left.
      • Form Dough: Pour in 6 tbsp steaming bone broth (or hot water) and stir vigorously until a smooth, pliable dough forms. Divide into 8 equal balls.
      • Press & Flatten: Sandwich each ball between reusable parchment sheets. Use a tortilla press or rolling pin to flatten into thin, even circles (aim for 4-5” diameter).
      • Fry to Golden Perfection
      • Heat avocado oil (1 cm deep) in a skillet over medium. Carefully peel parchment off a dough circle and fry for 2-3 minutes per side, pressing gently with a spatula to prevent curling.
      • Fry until golden and rigid. Drain on paper towels. Repeat for all shells.
      • Layer Your Low-Carb Masterpiece
      • Base: Place a large coconut-flour keto tortilla flat. Spoon 1/3 cup spiced beef into the center, leaving a 2” border.
      • Crunch Layer: Drizzle 2 tbsp keto nacho cheese sauce over the beef, then top with a crispy tostada shell.
      • Fresh Toppings: Spread 1 tbsp cultured coconut cream (or sour cream) over the shell. Add 1/2 cup butter lettuce, 1 tbsp charred cherry tomatoes, and 2 tbsp pepper jack cheese.
      • Seal the Deal: Place a small keto tortilla on top. Fold the edges of the large tortilla upward, pleating tightly around the small tortilla to encase the fillings.
      • Crisp the Crunchwrap
      • Lightly spray a skillet with avocado oil and heat over medium. Place the crunchwrap seam-side down and cook for 2-3 minutes until golden and sealed. Flip and repeat on the other side.
      • Serve & Savor
      • Slice diagonally and enjoy immediately, or wrap in foil for meal prep! The melty cheese, smoky beef, and shatter-crisp shell deliver all the fast-food vibes—with just 5 net carbs per serving.

      Keto Meat Pie

      Craving a hearty, guilt-free meal that satisfies your comfort food cravings?

      Check out this Keto Meat Pie. A tasty mix of seasoned minced meat, savory spices, and a golden, cheesy topping awaits. Best of all, it doesn’t use a traditional pie crust!

      Keto meat pie with a golden low-carb crust, filled with seasoned ground beef and melted cheese.

      This recipe is great for keto dieters and those watching carbs. It skips starchy fillers and focuses on bold ground beef flavor.

      For simple pie recipes, unique ground beef meals, or a dinner that the whole family will enjoy, this recipe is for you. Pre-cooking the beef locks in juiciness, while a layer of melted cheese adds irresistible richness. Plus, leftovers stay delicious, making it ideal for meal prep or quick keto lunches. Dive into this gluten-free, high-protein pie and redefine what’s possible with low-carb cooking!

      INGREDIENTS

      Savory Beef Base

      2 pounds lean ground beef (85/15) – High-quality, grass-fed beef for maximum flavor and optimal fat balance.

      1 teaspoon avocado oil – Lightly coats the pan for easy cooking (substitute with olive oil or ghee).

      Egg Binding & Texture

      6 large farm-fresh eggs, lightly beaten – Creates a custardy, pie-like base without starchy fillers.

      Flavor-Boosting Seasonings2 teaspoons garlic powder – Adds aromatic depth.

      2 teaspoons onion powder – Enhances savory umami notes.

      1 teaspoon dried oregano – Mediterranean herbiness for warmth.

      ¼ teaspoon cayenne pepper – A subtle, smoky heat (adjust to taste).

      1 teaspoon Diamond Crystal kosher salt – Balances flavors (use ½ tsp if substituting with fine-grain salt).

      Rich, Tangy Sauces

      6 ounces sugar-free tomato paste – Concentrated richness without added carbs.

      2 tablespoons bold Dijon mustard – Adds zesty complexity and emulsifies the mixture.

      Cheesy Finish

      1 ½ cups sharp cheddar cheese, shredded (divided) – Reserve ½ cup for a golden, bubbly topping.

      Step-by-Step

      Create a juicy, cheesy masterpiece with these foolproof instructions—no crust required!
      1. Prepare and Preheat

      Preheat the oven to 350°F. (175°C).

      Lightly grease a 9-inch pie plate with oil. Avocado or olive oil works well. Place the pie plate on a foil-lined baking sheet. This will catch drips and make cleanup easier.

      1. Build the Flavor Base

      In a large mixing bowl, whisk together:

      6 lightly beaten eggs (creates a custard-like texture)

      1 tsp Diamond Crystal kosher salt (or ½ tsp fine-grain salt)

      2 tsp garlic powder + 2 tsp onion powder (for savory depth)

      1 tsp dried oregano + ¼ tsp cayenne pepper (herbaceous warmth + subtle kick)

      Whisk in 2 tbsp Dijon mustard (for tangy richness) and 6 oz sugar-free tomato paste (for concentrated umami). Set aside.

      1. Cook the Beef to Perfection

      Heat a 12-inch skillet over medium heat.

      Add 2 lbs lean ground beef (85/15) directly to the dry skillet.

      Pro tip: If using extra-lean beef, add 1 tsp oil to prevent sticking.

      Break apart the beef with a spatula as it cooks. Sauté until mostly browned but slightly pink (about 5 minutes). This keeps it tender.

      Drain excess fat (if needed) and let cool slightly—this prevents the eggs from scrambling when mixed.

      1. Combine & Layer

      Fold the warm beef into the egg-spice mixture until fully coated.

      Stir in 1 cup shredded sharp cheddar (reserve ½ cup for topping).

      Press the mixture firmly into the greased pie plate, smoothing the top and edges to form an even layer.

      1. Cheesy Finish & Bake

      Sprinkle reserved ½ cup cheddar evenly over the top.

      Bake for 30 minutes on the middle rack until the edges turn golden, the center sets, and the cheese bubbles.

      1. Rest & Serve

      Let the pie cool 15-20 minutes in the pan—this ensures clean slices.

      Cut into wedges and serve warm.

      1. Storage & Reheating

      Refrigerate leftovers for up to 4 days or freeze for 3 months.

      Reheat slices in the microwave (90 seconds) or air fryer (5 minutes at 375°F) for crispy edges.

      Storage Instructions

      To keep your keto meat pie tasting fresh, store cooled leftovers in an airtight container in the fridge for up to 4 days.

      For best results, portion slices before refrigerating—this makes reheating a breeze! Heat individual servings in the microwave for 60-90 seconds with a cover. You can also use an air fryer. Set it to 375°F and cook for 4-5 minutes to get the cheesy crispness back.

      If the pie feels dry after being in the fridge, add a teaspoon of broth or water. This will keep it moist when you reheat it. Avoid leaving the dish at room temperature for over 2 hours to maintain food safety and flavor integrity. Perfect for grab-and-go lunches or quick keto dinners!

      Tips for Achieving Maximum Flavor

      Unlock bold, restaurant-quality taste in every bite with these chef-approved tricks! First, brown the ground beef in small batches. This helps avoid overcrowding the skillet. It also creates a nice, caramelized crust.

      Next, bloom the spices.

      After draining the beef, quickly sauté garlic powder, onion powder, and oregano in the leftover fat.

      This will enhance their aroma. For a tangy flavor, add a splash of beef broth or red wine vinegar to the skillet after cooking the meat. Then, stir those golden-brown bits into the egg mixture. Don’t skip the Dijon-tomato paste combo—it adds umami richness and balances the beef’s savoriness.

      Let the mixture rest for 10 minutes before baking. This helps the flavors blend.

      Use extra-sharp cheddar for a stronger cheesy taste. A sprinkle of smoked paprika on top before baking adds a nice smokiness. This makes the pie unforgettable!

      FAQ

      Q: Can I substitute the cheddar cheese with another type?

      A: Absolutely! While sharp cheddar adds a rich, tangy profile, pepper jack lends a spicy kick, or smoked gouda introduces a savory depth. For a dairy-free option, try nutritional yeast mixed with coconut oil for a cheesy flavor.

      Q: Why pre-cook the beef instead of baking it raw with the eggs?

      A: Searing the beef first caramelizes its fats and proteins, creating a deeper flavor base. Skipping this step can result in a bland, watery texture, as raw beef releases excess moisture during baking.

      Q: Can I use an egg substitute for this recipe?

      A: Yes! For a lighter texture, flax eggs (1 tbsp ground flax + 3 tbsp water per egg) work, though the pie may be slightly less firm. For a vegan twist, blend silken tofu with turmeric for color.

      Q: How do I prevent the pie from drying out?

      A: Avoid overbaking—30 minutes is ideal for a custardy center. If your oven runs hot, check at 25 minutes. Adding 1-2 tbsp heavy cream to the egg mixture also boosts moisture.

      Q: Is the cayenne pepper optional for milder palates?

      A: Yes! Omit it entirely or replace it with smoked paprika for warmth without heat. Alternatively, add zested lemon peel to brighten the dish without spiciness.

      Q: Can I freeze leftovers even though you advised against it?

      A: Freezing isn’t the best option because the eggs can become rubbery. To reduce texture changes, wrap portion slices tightly in containers lined with parchment. Thaw overnight in the fridge before reheating.

      Keto meat pie with a golden low-carb crust, filled with seasoned ground beef and melted cheese.

      Keto Meat Pie

      Prep Time 15 minutes
      Cook Time 40 minutes
      Total Time 1 hour 10 minutes
      Course Main Course
      Cuisine American
      Servings 8 slices
      Calories 405 kcal

      Ingredients
        

      Savory Beef Base

      • 2 pounds lean ground beef 85/15 – High-quality, grass-fed beef for maximum flavor and optimal fat balance.
      • 1 teaspoon avocado oil – Lightly coats the pan for easy cooking substitute with olive oil or ghee.

      Egg Binding & Texture

      • 6 large farm-fresh eggs lightly beaten – Creates a custardy, pie-like base without starchy fillers.
      • Flavor-Boosting Seasonings2 teaspoons garlic powder – Adds aromatic depth.
      • 2 teaspoons onion powder – Enhances savory umami notes.
      • 1 teaspoon dried oregano – Mediterranean herbiness for warmth.
      • ¼ teaspoon cayenne pepper – A subtle smoky heat (adjust to taste).
      • 1 teaspoon Diamond Crystal kosher salt – Balances flavors use ½ tsp if substituting with fine-grain salt.

      Rich Tangy Sauces

      • 6 ounces sugar-free tomato paste – Concentrated richness without added carbs.
      • 2 tablespoons bold Dijon mustard – Adds zesty complexity and emulsifies the mixture.

      Cheesy Finish

      • 1 ½ cups sharp cheddar cheese shredded (divided) – Reserve ½ cup for a golden, bubbly topping.

      Instructions
       

      Prepare and Preheat

      • Preheat the oven to 350°F. (175°C).
      • Lightly grease a 9-inch pie plate with oil. Avocado or olive oil works well. Place the pie plate on a foil-lined baking sheet. This will catch drips and make cleanup easier.

      Build the Flavor Base

      • In a large mixing bowl, whisk together:
      • 6 lightly beaten eggs (creates a custard-like texture)
      • 1 tsp Diamond Crystal kosher salt (or ½ tsp fine-grain salt)
      • 2 tsp garlic powder + 2 tsp onion powder (for savory depth)
      • 1 tsp dried oregano + ¼ tsp cayenne pepper (herbaceous warmth + subtle kick)
      • Whisk in 2 tbsp Dijon mustard (for tangy richness) and 6 oz sugar-free tomato paste (for concentrated umami). Set aside.

      Cook the Beef to Perfection

      • Heat a 12-inch skillet over medium heat.
      • Add 2 lbs lean ground beef (85/15) directly to the dry skillet.
      • Pro tip: If using extra-lean beef, add 1 tsp oil to prevent sticking.
      • Break apart the beef with a spatula as it cooks. Sauté until mostly browned but slightly pink (about 5 minutes). This keeps it tender.
      • Drain excess fat (if needed) and let cool slightly—this prevents the eggs from scrambling when mixed.

      Combine & Layer

      • Fold the warm beef into the egg-spice mixture until fully coated.
      • Stir in 1 cup shredded sharp cheddar (reserve ½ cup for topping).
      • Press the mixture firmly into the greased pie plate, smoothing the top and edges to form an even layer.

      Cheesy Finish & Bake

      • Sprinkle reserved ½ cup cheddar evenly over the top.
      • Bake for 30 minutes on the middle rack until the edges turn golden, the center sets, and the cheese bubbles.

      Rest & Serve

      • Let the pie cool 15-20 minutes in the pan—this ensures clean slices.
      • Cut into wedges and serve warm.

      Storage & Reheating

      • Refrigerate leftovers for up to 4 days or freeze for 3 months.
      • Reheat slices in the microwave (90 seconds) or air fryer (5 minutes at 375°F) for crispy edges.

      Easy Keto Chicken Enchilada Casserole Recipe: Gluten-Free & Flavor-Packed

      Craving the bold, spicy flavors of Mexican cuisine without the carbs? This Keto Chicken Enchilada Casserole is here to satisfy your taste buds while keeping you on track with your low-carb lifestyle! Packed with tender shredded chicken, melty cheese, and a rich, flavorful sauce, this gluten-free casserole is the ultimate comfort food for anyone following a keto diet.

      Keto chicken enchilada casserole layered with shredded chicken, low-carb tortillas, enchilada sauce, and melted cheese.

      A mouth-watering keto chicken enchilada casserole that’s both gluten-free and flavor-packed – perfect for a healthy meal!

      Perfect for busy weeknights or meal prep, this easy keto chicken enchilada casserole is a crowd-pleaser that’s as simple to make as delicious. Say goodbye to guilt and hello to a low-carb dinner that’s bursting with flavor!

      Ingredients

      Here’s what you’ll need to make this mouthwatering Keto Chicken Enchilada Casserole:

      For the Casserole :

      2 cups cooked shredded chicken (rotisserie chicken works great!)

      1 tbsp olive oil or avocado oil

      1 medium onion, finely chopped

      2 cloves garlic, minced

      1x bell pepper, diced (any color)

      1 x cup sugar-free enchilada sauce (store-bought or homemade)

      1x cup heavy cream or unsweetened almond milk

      1 x tsp ground cumin

      1x tsp chili powder

      1/2 tsp smoked paprika

      Salt and pepper to taste

      For the Topping:

      2 cups shredded cheddar cheese (or a mix of cheddar and Monterey Jack)

      1/4 cup chopped fresh cilantro (optional, for garnish)

      1 avocado, sliced (optional, for serving)

      Step-by-Step Directions

      Preheat the Oven :

      Preheat your oven to 375°F (190°C) and lightly grease a 9×13-inch baking dish.

      Prepare the Filling :

      Heat olive oil in a large skillet over medium heat. Sauté the onion, garlic, and bell pepper until softened, about 5 minutes.

      Add the shredded chicken, enchilada sauce, heavy cream (or almond milk), cumin, chili powder, smoked paprika, salt, and pepper. Stir to combine and let it simmer for 5 minutes.

      Assemble the Casserole :

      Transfer the chicken mixture to the prepared baking dish and spread it evenly.

      Sprinkle the shredded cheese on top, covering the entire surface.

      Bake :

      Bake in the preheated oven for 20-25 minutes, or until the cheese is bubbly and golden brown.

      Garnish and Serve :

      Remove the casserole from the oven and let it cool for 5 minutes. Garnish with fresh cilantro and avocado slices if desired. Serve warm and enjoy this low-carb comfort food masterpiece!

      Storage Instructions

      To store your Keto Chicken Enchilada Casserole, let it cool completely before covering it with plastic wrap or transferring it to an airtight container. It will stay fresh in the refrigerator for up to 3 days. To reheat, simply place individual portions in the microwave or warm the entire casserole in the oven at 350°F (175°C) until heated through. This dish is perfect for meal prep and makes a delicious leftover lunch or dinner!

      Tips for Achieving Maximum Flavor

      To make your Keto Chicken Enchilada Casserole even more flavorful, try these tips:

      Use rotisserie chicken for added depth of flavor and convenience.

      Make your own sugar-free enchilada sauce for a fresher, bolder taste.

      Add a pinch of cayenne pepper or diced jalapeños for extra heat.

      Top with a dollop of sour cream or guacamole for a creamy finish.

      Let the casserole rest for 5-10 minutes after baking to allow the flavors to meld together.

      Frequently Asked Questions

      1. Can I use store-bought enchilada sauce?

      Yes, you can use store-bought enchilada sauce, but make sure it’s sugar-free to keep it keto-friendly.

      1. Can I make this casserole ahead of time?

      Absolutely! Assemble the casserole, cover it, and refrigerate for up to 24 hours before baking. Add a few extra minutes to the baking time if cooking from cold.

      1. What can I use instead of shredded chicken?

      You can substitute shredded chicken with ground chicken, turkey, or even cauliflower rice for a vegetarian option.

      1. Is this recipe freezer-friendly?

      Yes, you can freeze the unbaked casserole for up to 2 months. Thaw it overnight in the fridge before baking.

      1. How can I make this dish spicier?

      Add extra chili powder, cayenne pepper, or diced jalapeños to the filling for a spicier kick.

      This Keto Chicken Enchilada Casserole is a must-try for anyone looking to enjoy a flavorful, low-carb meal that’s easy to prepare and perfect for sharing. With its cheesy, spicy goodness, it’s sure to become a family favorite!

      Keto chicken enchilada casserole layered with shredded chicken, low-carb tortillas, enchilada sauce, and melted cheese.

      Keto Chicken Enchilada Casserole

      Say goodbye to Guilt and Hello to a Low Carb lunch
      Prep Time 20 minutes
      Cook Time 25 minutes
      Course Main Course
      Servings 4 people

      Ingredients
        

      Ingredients

      For the Casserole:

      • 2 cups cooked shredded chicken rotisserie chicken works great!
      • 1 tbsp olive oil or avocado oil
      • 1 medium onion finely chopped
      • 2 cloves garlic minced
      • 1 bell pepper diced (any color)
      • 1 cup sugar-free enchilada sauce store-bought or homemade
      • 1 cup heavy cream or unsweetened almond milk
      • 1 tsp ground cumin
      • 1 tsp chili powder
      • ½ tsp smoked paprika
      • Salt and pepper to taste

      For the Topping:

      • 2 cups shredded cheddar cheese or a mix of cheddar and Monterey Jack
      • ¼ cup chopped fresh cilantro optional, for garnish
      • 1 avocado sliced (optional, for serving)

      Instructions
       

      Step-by-Step Directions

        Preheat the Oven:

        • Preheat your oven to 375°F (190°C) and lightly grease a 9x13-inch baking dish.

        Prepare the Filling:

        • Heat olive oil in a large skillet over medium heat. Sauté the onion, garlic, and bell pepper until softened, about 5 minutes.
        • Add the shredded chicken, enchilada sauce, heavy cream (or almond milk), cumin, chili powder, smoked paprika, salt, and pepper. Stir to combine and let it simmer for 5 minutes.

        Assemble the Casserole:

        • Transfer the chicken mixture to the prepared baking dish and spread it evenly.
        • Sprinkle the shredded cheese on top, covering the entire surface.

        Bake:

        • Bake in the preheated oven for 20-25 minutes, or until the cheese is bubbly and golden brown.

        Garnish and Serve:

        • Remove the casserole from the oven and let it cool for 5 minutes. Garnish with fresh cilantro and avocado slices if desired. Serve warm and enjoy this low-carb comfort food masterpiece!