Discovering the keto diet intrigued and intimidated me. Reducing carbs and increasing fats seemed challenging, but I was eager to try. It wasn’t just about cutting bread and pasta; it was about embracing nourishing whole foods.
One dish that caught my attention was eggplant parmesan. Traditionally laden with breadcrumbs and pasta sauce, this classic Italian dish seemed like a daunting task to convert into a keto-friendly version.
However, I soon realized that with a few adjustments, I could create a delicious meal that fit perfectly within my new dietary lifestyle.
Eggplant parmesan is a comforting dish that evokes memories of family gatherings and cozy dinners. The rich flavors of marinara sauce, gooey cheese, and tender eggplant create a symphony of taste that is hard to resist.
By swapping out high-carb ingredients for keto-friendly alternatives, I found a way to enjoy this beloved recipe without straying from my dietary goals.
The key lies in understanding the principles of the keto diet and how to adapt traditional recipes to fit those principles. With a little creativity and some experimentation, I was ready to embark on my journey to make the perfect keto eggplant parmesan.
Key Takeaways
Understanding the Keto Diet and Eggplant Parmesan
- The keto diet is a low-carb, high-fat diet that can help with weight loss and improve overall health.
- Eggplant Parmesan is a classic Italian dish that can be made keto-friendly by using low-carb ingredients.
- Opting for the Ideal Components for Keto Eggplant Parmesan:
- Opt for almond flour instead of traditional breadcrumbs to keep the dish low in carbs.
- Opt for full-fat mozzarella and Parmesan for a rich, creamy taste without extra sugars.
Eggplant prep and slicing for keto parmesan
- Slice the eggplant into rounds measuring 1/2 inch in thickness, and apply salt to extract moisture.
- Let eggplant sit for 30 mins, then rinse and pat dry to remove bitterness.
Keto-friendly breading and baking
- Dip eggplant in eggs, coat with almond flour, Parmesan, and seasoning.
- Bake eggplant slices until golden and crispy.
Layering and Baking the Keto Eggplant Parmesan
- LLayer marinara, eggplant, and mozzarella in a dish.
- Layer ingredients, bake until cheese is melted and bubbly.
Serving and Enjoying Keto Eggplant Parmesan
- Let the dish chill out a bit before serving so the flavors can mix together.
- Top with basil and pair with a salad for a keto meal.
Choosing the Right Ingredients for Keto Eggplant Parmesan
Fresh and Organic Eggplants
I chose fresh, organic eggplants for better taste and fewer pesticides.I remember the first time I picked up an eggplant at the farmer’s market, its glossy skin and vibrant purple hue were so inviting. I knew I wanted to use two medium-sized eggplants for this recipe, as they would yield enough slices for eight generous servings.
Essential Ingredients
In addition to the eggplants, I gathered other essential ingredients: almond flour for breading, which serves as a low-carb alternative to traditional breadcrumbs,and an abundance of mozzarella cheese to achieve that delightful melted texture we all desire.
I also chose a homemade marinara sauce made from crushed tomatoes, garlic, and fresh basil—no added sugars here!
A Delicious Combination
Keto-friendly ingredients enhance flavor. As I laid everything out on my kitchen counter, I felt a sense of excitement building; I was ready to create something special.
Preparing and Slicing the Eggplant for Keto Eggplant Parmesan
Preparing the eggplant is an essential step in achieving the perfect texture for my keto eggplant parmesan. I remember my first attempt at slicing eggplant; it was a bit of a learning curve!
To start, I washed the eggplants thoroughly and then cut off the tops.
Next, I sliced them into half-inch thick rounds. This thickness is crucial because it allows the eggplant to cook evenly while still retaining some bite.
As I sliced through the tender flesh, I could already envision how these rounds would soak up the marinara sauce and meld with the cheese.
Sprinkled salt on eggplant slices, let sit 30 mins. This step is vital as it draws out excess moisture and bitterness from the eggplant.
While waiting, I reminisced about my grandmother’s kitchen, where she would often prepare her famous eggplant dishes.
The aroma of garlic and herbs would fill the air, making it impossible to resist sneaking bites before dinner was served.
Once the eggplant had released its moisture, I rinsed off the salt and patted each slice dry with paper towels. This preparation ensured that my ketogenic eggplant parmesan would be flavorful and not soggy.
Breading and Baking the Eggplant for Keto Eggplant Parmesan
| Step | Description |
|---|---|
| 1 | Slice the eggplant into 1/2 inch rounds |
| 2 | Season the eggplant slices with salt and let them sit for 30 minutes to draw out moisture |
| 3 | Pat the eggplant slices dry with paper towels |
| 4 | Dip the eggplant slices in beaten eggs |
| 5 | Coat the eggplant slices in a mixture of almond flour, grated parmesan cheese, and Italian seasoning |
| 6 | Place the coated eggplant slices on a baking sheet lined with parchment paper |
| 7 | Bake the eggplant slices at 400°F for 20-25 minutes, flipping halfway through |
Breading the eggplant is where the magic truly begins! For my low-carb version, I used almond flour mixed with Italian seasoning to create a flavorful coating that would give each slice a satisfying crunch. As I dipped each round into beaten eggs before coating them in the almond flour mixture, I felt like a kid again, playing in the kitchen.
The process was surprisingly therapeutic; each slice transformed from a simple vegetable into something special. Once all the slices were breaded, it was time to bake them to perfection.
I preheated the oven to 400°F and placed breaded eggplant on a parchment-lined sheet.
The aroma of toasted almond flour filled my kitchen as they baked for about 25 minutes until golden brown and crispy.
I couldn’t help but sneak a taste of one of the freshly baked slices; it was crunchy on the outside and tender on the inside—a delightful preview of what was to come in my low-carb eggplant parmesan.
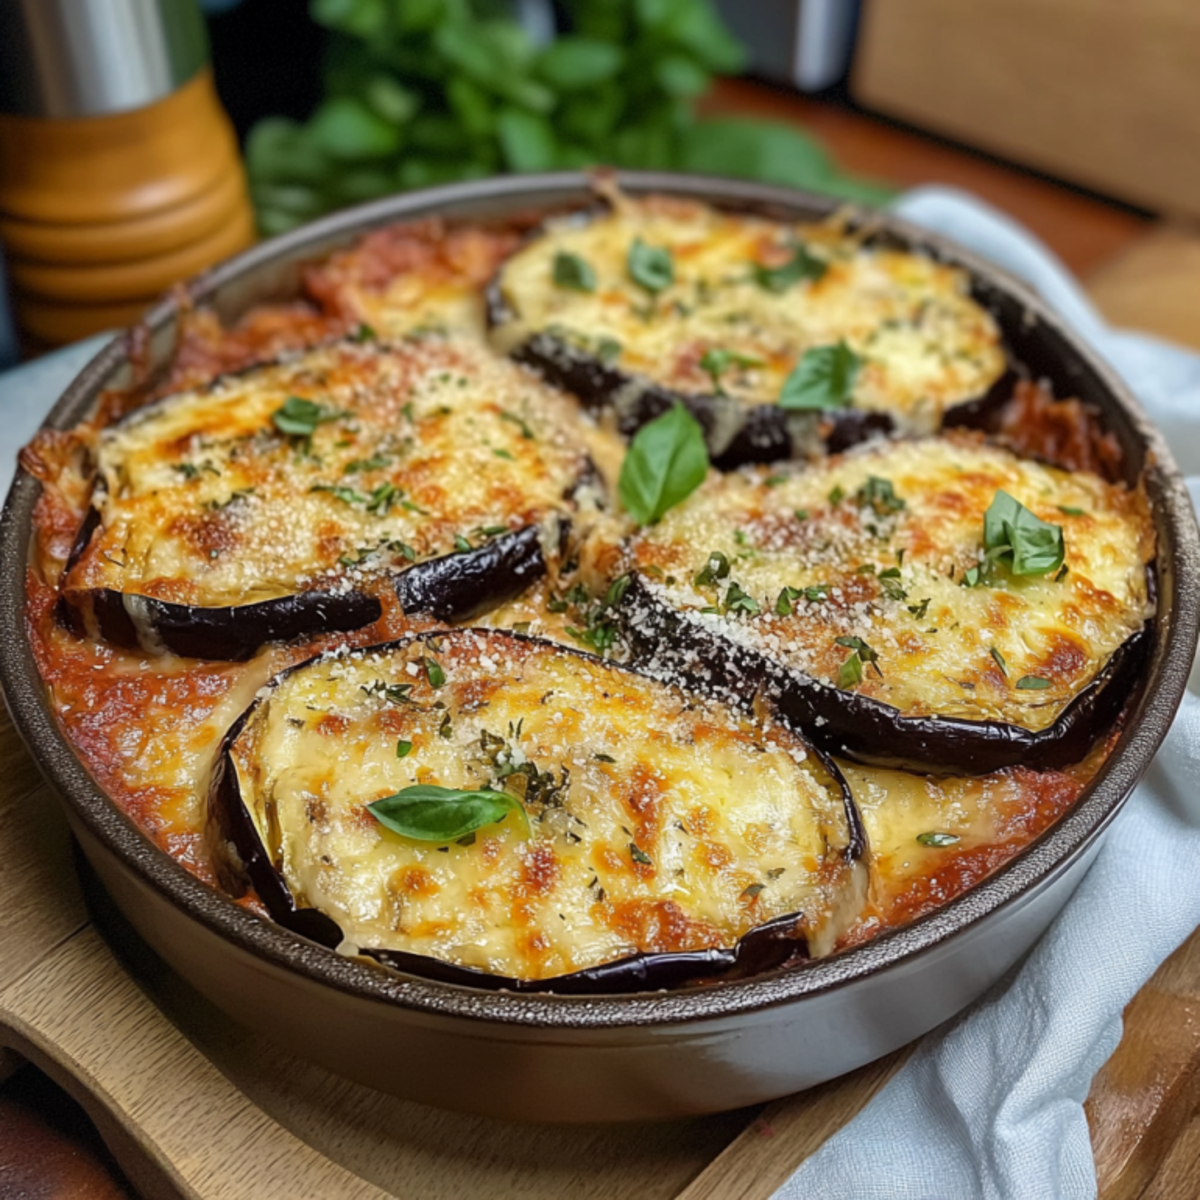
Layering and Baking the Keto Eggplant Parmesan
With my crispy eggplant rounds ready, it was time to assemble my low-carb eggplant parmesan masterpiece! In a large baking dish, I spread a thin layer of marinara sauce at the bottom—this would prevent sticking and add flavor right from the start. Then came the fun part: layering!
I layered eggplant slices on the sauce, added mozzarella, and topped with more marinara.
The colors were vibrant, and as I layered each component, I could almost hear my family’s laughter echoing in my mind from past dinners. After repeating this process until all ingredients were used up, I topped off my creation with one final layer of cheese—because who doesn’t love extra cheese?
With everything assembled, I slid the baking dish into the oven at 375°F (190°C) for about 30 minutes. The kitchen filled with an irresistible aroma as it baked, making my mouth water. The bubbling cheese and rich marinara sauce were a sight to behold; it felt like a celebration of flavors coming together in perfect harmony.
Serving and Enjoying Your Perfect Keto Eggplant Parmesan
A Taste of Nostalgia
The moment I tasted it, I was hit with a wave of nostalgia—those family dinners where we laughed and shared stories over a table full of delicious food.
This low-carb version of eggplant parmesan not only satisfied my cravings but also brought me closer to those cherished moments.
Sharing this dish with friends who were also exploring the ketogenic diet made it even more special; we laughed over our culinary adventures while savoring each bite together.
FAQs
What is the keto diet and how does it relate to eggplant parmesan?
The keto diet is a low-carb, high-fat diet that has been shown to help with weight loss and improve overall health. Eggplant parmesan is a popular Italian dish that traditionally includes breaded and fried eggplant, making it high in carbs. This article provides a keto-friendly version of eggplant parmesan that uses low-carb ingredients to fit within the parameters of the keto diet.
What are the key ingredients needed to make keto eggplant parmesan for 8 servings?
The key ingredients for making low-carb eggplant parmesan for 8 servings include eggplant, almond flour, grated parmesan cheese, eggs, marinara sauce (with no added sugar), mozzarella cheese, and seasonings such as salt, pepper, and Italian herbs. These ingredients are chosen to be low in carbs and high in fat to align with the keto diet.
How should the eggplant be prepared and sliced for keto eggplant parmesan?
To prepare the eggplant for low-carb eggplant parmesan, it should be sliced into 1/2 inch rounds.Salt eggplant slices and let sit for 30 mins to remove moisture. This process helps to prevent the eggplant from becoming soggy during the cooking process.
What is the process for breading and baking the eggplant for keto eggplant parmesan?
After the eggplant rounds have been salted and drained, they should be dipped in beaten eggs and then coated in a mixture of almond flour, grated parmesan cheese, and seasonings. The breaded slices of eggplant are subsequently arranged on a baking tray and subjected to oven baking until they achieve a golden brown hue and a crispy texture.
How do you layer and bake keto eggplant parmesan?
After breading and baking the eggplant slices, they are arranged in a baking dish with marinara sauce and shredded mozzarella cheese.This layering process is repeated until all of the ingredients are used, and the dish is then baked in the oven until the cheese is melted and bubbly.

Keto Eggplant Parmesan
Ingredients
- 2 medium eggplant sliced into 1/2 inch slices
- ½ teaspoon salt
- 2 cups keto bread crumbs
- 1 tablespoon Italian seasoning
- 3 large eggs
- ¾ cup milk
- 2-3 tablespoons oil to fry
- 4 cups keto marinara sauce
- 3 cups mozzarella cheese freshly grated
- 1 cup parmesan cheese freshly grated
Instructions
Slice the eggplant into ½-inch rounds
- Wash the eggplants thoroughly and cut off the tops. Slice them into half-inch thick rounds.
Salt and drain the eggplant
- Sprinkled salt on eggplant slices, let sit 30 mins. Rinse off the salt and pat dry with paper towels.
Breading process
- Dip the eggplant slices in beaten eggs, then coat in a mixture of almond flour, grated parmesan cheese, and Italian seasoning.
Bake the breaded eggplant
- Preheat the oven to 400°F. Place breaded eggplant on a parchment-lined sheet. Bake for 20–25 minutes until golden and crispy, flipping halfway through.
Layer the casserole
- In a baking dish, spread marinara sauce, add a layer of baked eggplant, then mozzarella cheese. Repeat layers until ingredients are used, finishing with cheese.
Bake the assembled casserole
- Bake at 375°F (190°C) for 30 minutes until cheese is melted and bubbly.
Rest before serving
- Let the dish chill out a bit before serving so the flavors can mix together.